
User Guide
Position Size Calculator & Order Manager
Accessing the tool
The Position Size Calculator & Order Manager is a drawing tool. Access it in one of the following ways:
From the Drawing Tools menu:
- Open the Drawing Tools menu.
- Select Position Size Calculator & Order Manager.
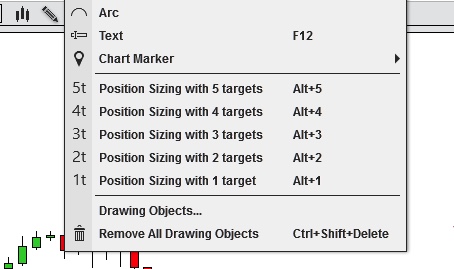
Quick access methods:
- Add the tool to the Drawing Tools Tile indicator for one-click access.
- Assign a hot key for instant activation via keyboard shortcut:
- Open the NinjaTrader Control Center.
- Go to Tools -> Hot keys.
- Assign your preferred key combination.
Setting up a new position
- Select the account you want to use for the new position in Chart Trader panel.
- Activate the Position Size Calculator & Order Manager tool with the number of targets needed to scale out of your position.
Important: The tool locks to the account selected in Chart Trader at the time of drawing. Changing the account in Chart Trader afterward will not affect the tool. If you draw the tool for the wrong account, delete it, select the correct account, and draw it again.
Commission cost
If a Commission Template is applied to the selected account, the calculated Risk and Target dollar amounts include the applicable commission cost. For more information, review the NinjaTrader 8 help guide sections on Applying Commission Templates and Working With Commission Templates.
Understanding the tool Properties
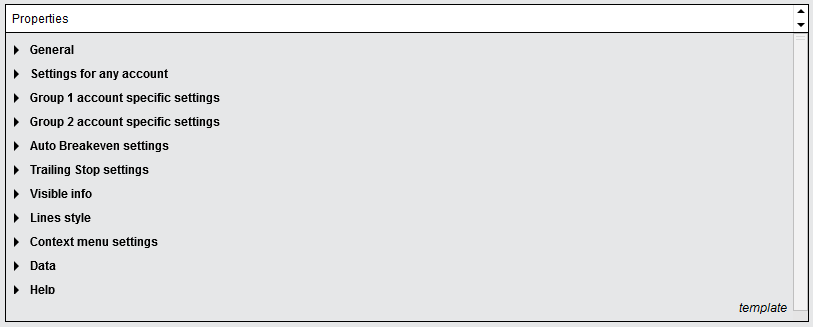
The screenshot below shows all available parameters for the Position Size Calculator & Order Manager. Refer to the following sections for detailed explanations of each parameter.
General
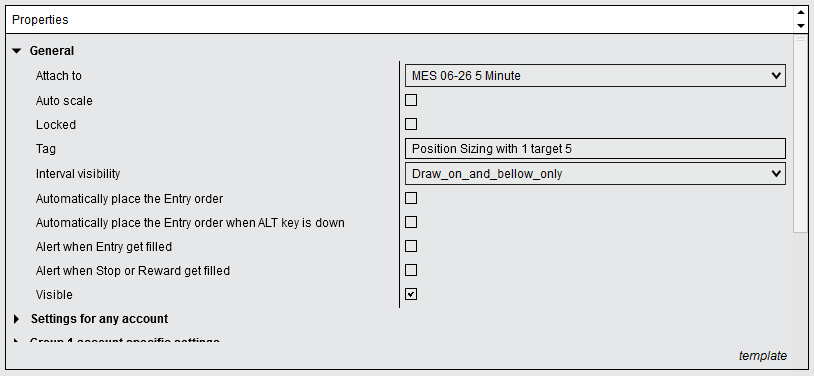
Attach to
By default, Position Sizing drawings are attached only to the chart they were drawn on, making them visible only on that specific chart (local drawing object). This parameter allows you to change the Position Sizing drawing to a global drawing object by selecting the instrument name followed by “(All charts)” from the dropdown menu.
Local: The Position Sizing drawing is visible only on the specific chart where it was drawn. Local Position Sizing drawings are lost when the chart is closed.
Global: The Position Sizing drawing is visible on all charts of the same instrument, including any new charts opened for that instrument. Global Position Sizing drawings are stored persistently—even if you close all charts of that instrument, the Position Sizing drawing will reappear when you open a new chart for the same instrument.
Example: Changing “Attach to” from “MES 06-26 5 Minute” to “MES 06-26 (All charts)” makes the Position Sizing drawing visible on all MES 06-26 charts, regardless of the time frame.
Note: Additionally, the Position Sizing drawing can be attached to an indicator so that it will be associated with the indicator and its scale but we recommend to attach it to using Local or Global.
Auto scale
When enabled, the Position Sizing drawing is included to the auto-scaling of the chart so the vertical axis of the chart will be adjusted such that the Position Sizing drawing will always be visible.
Locked
Enable this parameter to automatically lock the tool after drawing, preventing accidental repositioning when scrolling your chart. To apply this parameter to all new drawings, save it as your Default Template (Template → Save → Save as Default).
Tag
A custom identifier that can be assigned to the Position Sizing drawing for organizational purposes.
Interval visibility
Controls on which chart intervals the tool is visible. Choose from the following options:
All
The drawing is visible on all chart intervals.
Draw_on_and_below
The drawing is visible on the chart interval where it was drawn and all lower (shorter) intervals.
Example: Drawing on 60-minute chart makes it visible on 60-minute, 15-minute, 5-minute, etc., but hidden on daily charts. Use this to avoid clutter when viewing higher chart intervals.
Automatically place the Entry order
When this parameter is enabled, the Entry pending order is automatically placed immediately upon deselecting the drawing. To deselect the drawing, click outside of it.
If the tool is moved while an Entry order is pending, that order is automatically cancelled. Once the drawing is repositioned, the Entry order is automatically resubmitted when clicking outside the tool to deselect it.
To bypass automatic Entry order submission without deactivating this parameter, hold down the Alt key when clicking outside the tool to deselect it. This prevents automatic submission of the Entry Order.
Enable or disable this parameter by right-clicking on the drawing and selecting “Automatic Order Submission” from the context menu.
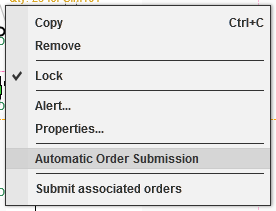
Visual indicator: A green dot is visible on the left side of the Entry anchor point when the Automatic Order Submission is active.

Automatically place the Entry order when ALT key is down
For occasional automatic Entry order submission, enable the parameter ‘Automatically place the Entry order when ALT key is down‘. When this parameter is enabled, the Entry pending order is automatically placed upon deselecting the drawing while holding the ALT key. To deselect the drawing without automatically submitting the Entry order, click outside of it without pressing the ALT key.
If the tool is moved while an Entry Order is pending, that order is automatically cancelled. After repositioning the drawing, hold the ALT key when clicking outside the tool to deselect it and automatically resubmit the Entry Order.
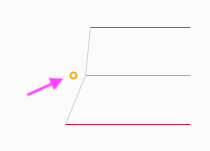
Visual indicator: An orange donut appears on the left side of the Entry anchor point when this parameter is active.
Alert when Entry get filled
When the parameter called ‘Alert when Entry get filled’ is active, an alert will be sent to your mobile device through our product called ‘Instant alerts on mobile devices‘ when the Entry order gets filled. This ensures real-time notifications to mobile devices, even when not actively using NinjaTrader.
Alert when Stop or Reward get filled
When the parameter ‘Alert when Stop or Reward get filled’ is active, an alert is sent to the mobile device through our product called ‘Instant alerts on mobile devices‘ when either the Stop or Target order is filled. This provides real-time notifications to mobile devices, even when not actively using NinjaTrader.
Visible
Controls whether the Position Sizing drawing is displayed on the chart. Unchecking this parameter hides the Position Sizing drawing without deleting it, allowing you to temporarily remove it from the chart view and restore it later.
Account-Specific settings
The Properties window contains three sections:
- Settings for any account
- Group 1 account specific settings
- Group 2 account specific settings
To configure different parameters for specific accounts, use either Group 1 or Group 2. In the respective parameter labeled “Account names for group 1 specific settings” or “Account names for group 2 specific settings“, enter the account names exactly as they appear in the Chart Trader panel or in the ‘Display Name’ column in the Control Center window. Account names are case sensitive. Separate multiple accounts with a comma and space.
Example: Sim101, Sim102

After configuring the desired parameters, save them as a default template by clicking ‘Template’ at the bottom of the Properties window. This applies the parameters to all new drawings.
Note: The parameters listed below are explained for the Settings for any account section. Group 1 account specific settings and Group 2 account specific settings contain the same set of parameters with identical functionality.
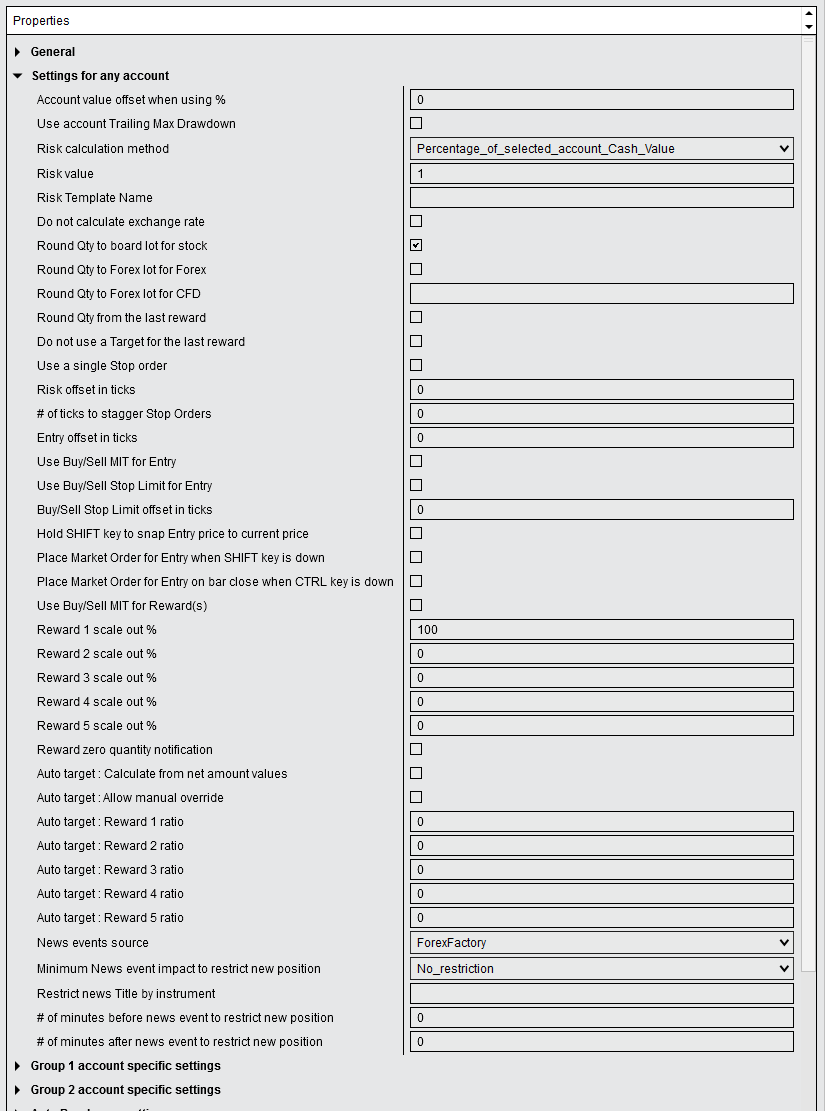
Account value offset when using %
When a non-zero number is entered in this parameter, the selected Account value is offset by this amount when the Risk Method is set to one of the Percentage of Account value options.
- A positive offset increases the account value.
- A negative offset decreases the account value.
Use case: This parameter is useful for trading funded accounts. For instance, if the allowed drawdown is only $1,500 for a $25,000 account, effectively reducing the available trading funds to $1,500, set an offset of -23500. This ensures the tool calculates the percentage of risk based on the adjusted account value of $1,500.
Use account Trailing Max Drawdown
When this parameter is enabled and the Risk Calculation Method is set to one of the Percentage of Account value options, the position size is calculated based on the account’s Trailing Max Drawdown value rather than the full account value.
What is the Trailing Max Drawdown? The Trailing Max Drawdown is a risk limit enforced by NinjaTrader Brokerage that tracks the lowest your account equity can reach before your account is disabled for trading. As your account equity grows, this floor trails upward — but it never moves down. For a complete explanation, refer to the official NinjaTrader documentation on Trailing Max Drawdown.
Why use this parameter? When trading a funded account through NinjaTrader Brokerage that enforces a Trailing Max Drawdown, the effective capital you can risk is not your full account value — it is the distance between your current equity and the Trailing Max Drawdown floor. Enabling this parameter ensures the tool calculates your position size based on that available risk buffer rather than your total account value, preventing you from inadvertently over-sizing a position relative to your actual risk limit.
Example: If your account equity is $55,000 and your Trailing Max Drawdown floor is $53,500, the available risk buffer is $1,500. With this parameter enabled and a Risk value of 1%, the tool will risk 1% of $1,500 ($15) rather than 1% of $55,000 ($550).
Risk Calculation Method
Select from the following options:
- Percentage_of_selected_account_Cash_Value
- The quantity (number of units to trade) is calculated from the percentage of the account Cash Value entered in the ‘Risk value’ parameter. To risk 0.5% of the account Cash Value, enter “0.5” in the ‘Risk value’ parameter.
- Note: NinjaTrader 8 defines Cash Value as the cash value of the account.
- Percentage_of_selected_account_Buying_Power
- The quantity (number of units to trade) is calculated from the percentage of the account Buying Power entered in the ‘Risk value’ parameter. To risk 0.5% of the account Buying Power, enter “0.5” in the ‘Risk value’ parameter.
- Note: NinjaTrader 8 defines Buying Power as the account’s buying power, taking margin into account.
- Percentage_of_selected_account_Total_Cash_Balance
- The quantity (number of units to trade) is calculated from the percentage of the account Total Cash Balance entered in the ‘Risk value’ parameter. To risk 0.5% of the account Total Cash Balance, enter “0.5” in the ‘Risk value’ parameter.
- Note: NinjaTrader 8 defines Total Cash Balance as the total cash available in the account including any debits or credits.
- Percentage_of_selected_account_Net_Liquidation
- The quantity (number of units to trade) is calculated from the percentage of the account Net Liquidation entered in the ‘Risk value’ setting box. To risk 0.5% of the account Net Liquidation, enter “0.5” in the ‘Risk value’ setting box.
- Note: NinjaTrader 8 defines Net Liquidation as the total worth of the account’s assets (including margin).
Risk Template Name
This parameter specifies the applicable Risk Template Name. The Risk Template allows setting a maximum order quantity for each instrument. The tool reads the ‘Max Order Size’ from the Risk Template applicable to the instrument and limits the position size to this value. For more information, review the NinjaTrader 8 help guide on using the Risk window.
Do not calculate exchange rate
When the instrument currency differs from the account currency, the tool automatically calculates all amounts in the account currency and adjusts the number of units accordingly. This requires a valid exchange rate. Recent data for the corresponding Forex pair is required. For example, if the account is in Euro and the instrument is ES, recent data for the EURUSD Forex instrument is needed. Obtain this data by opening a chart or adding the instrument to the Market Analyser window. Use the free end-of-day Kinetick data or a real-time data feed service that includes Forex data.
When this option is active, the tool calculates amounts in the instrument currency instead of the account currency.
Round Qty to board lot for stock
When selected, the quantity (number of shares) is rounded down to the nearest board lot. For American stocks, the board lot is 100 shares. For the Toronto Stock Exchange, the board lot is defined as follows:
- Share price below $0.10: board lot is 1,000
- Share price from $0.10 to $0.99: board lot is 500
- Share price $1.00 and above: board lot is 100
Note: This parameter only rounds the quantity if the chart instrument type is defined as Stock in the NinjaTrader Instrument settings.
Round Qty to Forex lot for Forex
The quantity (number of units) is rounded to Forex lots in blocks of 1,000 units.
Note: This parameter only rounds the quantity if the chart instrument type is defined as Forex in the NinjaTrader Instrument settings.
Round Qty from the last reward
When using more than one reward and the total quantity for the trade cannot be divided evenly across all rewards, the rounding is performed from the first reward by default. When this parameter is active, the rounding is performed from the last reward instead.
Do not use a Target for the last reward
When this parameter is active, only a Stop order is placed. The associated Target order is not placed and is not visible. This allows trailing the stop.
If this parameter is changed from active to inactive in the Properties window, the last reward anchor will appear behind the Entry anchor.
Use a single Stop order
When this option is active, a single Stop order is used for all targets instead of using a specific Stop order for each target. This is especially beneficial for stock trading given the commission cost structure. Using a single Stop order reduces commission expenses if the price triggers the stop.
Risk offset in ticks
When a value other than 0 is set, the risk price is automatically offset by this many ticks. The value can be positive or negative. A positive offset increases the risk, whereas a negative offset reduces the risk.
Examples for a long position on ES:
- Value of 1: If the risk is drawn at 3900.50, the tool automatically moves the risk anchor to 3900.25, increasing the risk by 1 tick
- Value of -1: If the risk is drawn at 3900.50, the tool automatically moves the risk anchor to 3900.75, decreasing the risk by 1 tick
Use case: This parameter is useful for traders who snap the risk to a previous bar point such as the low of the bar but prefer a small offset.
Note: This parameter has no effect when changed for an existing drawing. Save this parameter as a Default Template to apply it to subsequent drawings.
# of ticks to stagger Stop Orders
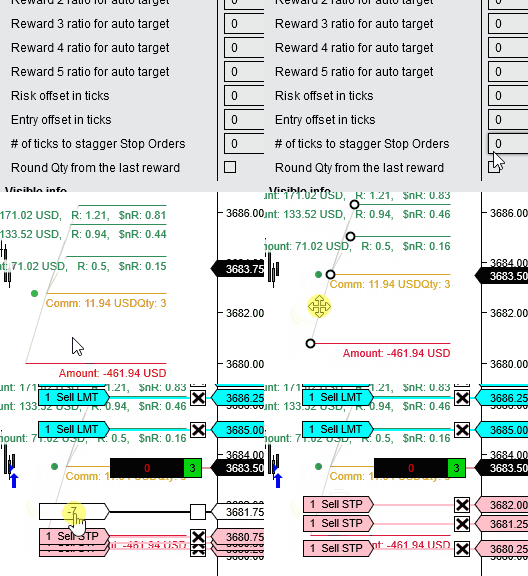
NinjaTrader combines all orders at the same price into a single order line visible on the chart. When using multiple rewards, to independently manage each stop associated with each reward from the chart, use a different price value for each stop. This way, NinjaTrader displays a specific order line on the chart for each Stop, allowing independent manual management of each stop from the chart.
To activate this feature, enter the number of ticks by which each Stop order price should be incremented. A positive value moves the Stops further from the Entry, and a negative value moves the Stops closer to the Entry.
Entry offset in ticks
When a value other than 0 is set, the entry price is automatically offset by this many ticks. The value can be positive or negative. A positive offset moves the entry toward the profit target by that number of ticks. A negative offset moves the entry toward the risk by that number of ticks.
Examples for a long position on ES:
- Value of 1: If the entry is drawn at 3900.50, the tool automatically moves the entry anchor to 3900.75
- Value of -1: If the entry is drawn at 3900.50, the tool automatically moves the entry anchor to 3900.25
Use case: This setting is useful for traders who snap the entry to a previous bar point such as the low of the bar but prefer a small offset.
Note: This setting has no effect when changed for an existing drawing. Save this setting as a Default Template to apply it to subsequent drawings.
Use Buy/Sell MIT for Entry
By default, if the entry is a Limit Order (for example, this occurs when the entry price is below the current market price for a long position), the tool places a pending Buy Limit order.
Select this option to use a ‘Market If Touched’ (MIT) Order instead of a Limit Order for your Entry.
Use Buy/Sell Stop Limit for Entry
By default, if the entry is a Stop Order (for example, this occurs when the entry price is above the current market price for a long position), the tool places a pending Stop Market order.
Select this option to use a Stop Limit Order instead of a Stop Market Order for your Entry.
Buy/Sell Stop Limit Offset in Ticks
This parameter specifies how many ticks beyond the Entry price you are willing to have the Entry Stop Limit Order filled.
Note: The parameter “Use Buy/Sell Stop Limit for Entry” must be selected for this parameter to be effective.
Example: If you enter 2 in this parameter, and your entry price for a long position is at 3900.00 on ES, then at the worst case scenario you could be filled 2 ticks beyond your Limit price at 3900.50.
Hold SHIFT key to snap Entry price to current price
When this option is active and the Position Sizing drawing is selected, holding down the SHIFT key makes the Entry anchor price follow the current market price.
Place Market Order for Entry when SHIFT key is down
When this parameter is enabled, a market order is submitted immediately upon deselecting the drawing by holding down the Shift key. This is useful when you want to enter at the current market price rather than waiting for a limit order to be filled.
Prerequisites — ensure the following parameters are all active:
- Automatically place the Entry order
- Hold Shift key to snap Entry price to current price
- Place Market Order for Entry when Shift key is down
How it works:
- Use the Position Sizing tool to draw the Stop Loss, the Entry, and the Target at their desired locations
- Hold the Shift key — the entry price snaps to the current market price
- Click outside the drawing while holding the Shift key to deselect it — a market order is submitted immediately at the best available price based on the liquidity of the instrument traded
- If the Shift key is not held down when clicking outside of the drawing, a limit order is placed instead
Place Market Order for Entry on bar close when CTRL key is down
When this parameter is enabled, a market order can be submitted at the close of the current bar by holding down the Shift and Ctrl keys simultaneously. This is useful when you want to enter at bar close rather than immediately at the current price.
Prerequisites — ensure the following parameters are all active:
- Automatically place the Entry order
- Hold Shift key to snap Entry price to current price
- Place Market Order for Entry when Shift key is down
- Place Market Order for Entry on bar close when Ctrl key is down
How it works:
- Use the Position Sizing tool to draw the Stop Loss, the Entry, and the Target at their desired locations.
- Hold the Shift key — the entry price snaps to the current market price.
- Continue holding the Shift and Ctrl keys. The market order will be submitted at the close of the current bar using one of the following two methods:
- Click to deselect — Click outside the drawing while holding Shift and Ctrl to schedule the order for submission at the next bar close. If you click on the drawing to reselect it before the bar closes, the pending market order is cancelled.
- Passive wait — Keep the drawing selected while holding Shift and Ctrl and simply wait — the order will be submitted automatically when the current bar closes.
Because a market order is submitted, it will be filled immediately at the best available price based on the liquidity of the instrument traded.
Use Buy/Sell MIT for Reward(s)
By default, the tool places a pending Limit order for the Reward(s) (Targets).
Select this option to use a ‘Market If Touched’ (MIT) Order instead of a Limit Order for all Reward(s).
Reward 1 to 5 Scale Out %
These parameters define how the position size should be split among the number of rewards.
For Position Sizing with 1 target:
- Leave the Reward 1 scale out % at 100
- All other Reward scale out % parameters have no effect
For Position Sizing with 3 targets:
- Set the percentage of the trade quantity to close when the price reaches Target 1 in the Reward 1 scale out % parameter
- Set the percentage of the trade quantity to close when the price reaches Target 2 in the Reward 2 scale out % parameter
- Set the percentage of the trade quantity to close when the price reaches Target 3 in the Reward 3 scale out % parameter
- The values in Reward 4 scale out % and Reward 5 scale out % have no effect
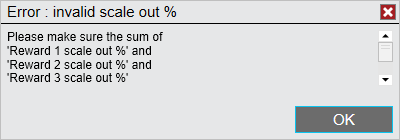
Important: Ensure the sum of all active Reward percentages equals 100. If the sum is not 100, you will receive an error message and your values will be automatically replaced by the default scale out values.
Reward zero quantity notification
The tool will, by default, block the placement of an entry order if any target has a quantity of zero. This situation can arise when the risk amount is insufficient to allocate at least a quantity of one to all targets. When this parameter is enabled, the entry order will still be placed even if one target has a quantity of zero, as long as the entry order quantity is at least 1. In such cases, a warning message will notify that one target has a quantity of zero.
Auto Target: Calculate From Net Amount Values
By default, the tool calculates the auto target from ticks. For example, if you set 2 in the “Reward 1 ratio for auto target” option and you have 10 ticks between the stop and the entry, Target 1 will be automatically placed 10 ticks away from the entry.
If you activate the option “Calculate auto target from net amount values”, the target will be placed with the required number of ticks away from the entry such that the target amount value will be as close as possible to the net amount of risk including the commission cost.
Auto target: allow manual override
This parameter works in conjunction with the “Reward ratio for auto target” parameters.
When this parameter is active:
You can manually move the Reward anchor points. If you move a reward anchor, that anchor is no longer automatically calculated and will remain static until you manually move it again.
When not active:
The Reward anchors cannot be adjusted as the value is automatically calculated from the “Reward ratio for auto target” parameters.
Auto target : Reward 1 to 5 ratio
When you input a number different than 0, that number is used to automatically calculate the respective Reward price based on the number of ticks for the Risk.
Example: If there are 10 ticks between the Entry and the Risk, and this parameter has a value of 1.5, the Reward will automatically be created 15 ticks away from the Entry.
When this parameter is active, you don’t need to draw the Reward anchors. For multiple targets, you can set a ratio only for specific targets. In that case, you will manually draw the Rewards that don’t have a ratio set, and the tool will automatically draw the Rewards that have a ratio value different than 0.
News Events restriction:
Some traders have restrictions on trading around news events. For example, some funded accounts firms do not allow traders to open a trade a number of minutes before/after high impact news. The following parameters allow you to configure the drawing tool to account for these restrictions.

News events source
You can select either Myfxbook or Forex Factory as the news provider. Forex Factory news will be downloaded automatically from the Forex Factory website. If you select Myfxbook, you need to manually get the news source file from the Myfxbook website.
Minimum News event impact to restrict new position
This parameter allows you to select the news event Impact level at which the restriction will be applicable.
Examples:
- If you are not allowed to trade around High impact news events, select High
- If you are not allowed to trade around Medium and High impact news events, select Medium_High
- Setting the value to No_restriction will not cause any restriction related to news Impact level
Restrict news Title by instrument
Some funded accounts firms do not allow trading specific instruments around certain news events. For example, a Prop Firm might not allow trading CL around “Crude Oil Inventories”. If such restrictions apply to your trading, configure this parameter as follows:
Enter the instrument name followed by a comma followed by the news event title. No space between the delimiters. Separate each instrument with a semicolon (no space).
Example:CL,Crude Oil Inventories,API Weekly Statistical Bulletin;ES,FOMC,Unemployment Rate
# of minutes before news event to restrict new position
This parameter specifies how many minutes before a restrictive news event a new position cannot be opened.
# of minutes after news event to restrict new position
This parameter specifies how many minutes after a restrictive news event a new position cannot be opened.
Auto Breakeven settings
You can configure up to 5 different breakeven rules. Each rule has the following parameters:
Applicable To
Select which Reward’s associated Stop Loss will move to breakeven:
- All Stops: Moves all Stop Losses together
- Stop 1: Only moves the Stop Loss associated with Reward #1 order
Trigger type
Select from the following options:
Typical Bid Ask:
- For a Long position, the Ask price is monitored to trigger the breakeven
- For a Short position, the Bid price is monitored to trigger the breakeven
Opposite Bid Ask:
- For a Long position, the Bid price is monitored to trigger the breakeven
- For a Short position, the Ask price is monitored to trigger the breakeven
Last Price:
- For a Long position, the Last price is monitored to trigger the breakeven
- For a Short position, the Last price is monitored to trigger the breakeven
Trigger offset
This parameter defines the amount of profit required to move the Stop Loss. If you leave this parameter empty, the Stop Loss will not be moved to Breakeven. The syntax can be one of the following:
Format options:
- A number followed by R
- A number followed by %T followed by the referenced reward number
- A number followed by T
Examples:
0.5R– Once the profit reaches 50% of the initial risk (0.5R), the Stop Loss will be moved1.5R– Once the profit reaches 150% of the initial risk (1.5R), the Stop Loss will be moved50%T1– Once the profit reaches 50% of the targeted profit defined by Reward #1 (1st target), the Stop Loss will be moved100%T3– Once the profit reaches Reward #3 (3rd target), the Stop Loss will be moved10T– Once the profit reaches 10 ticks, the Stop Loss will be moved
Offset from Entry
This parameter configures the offset to move the Stop Loss relative to the average entry price. If you leave this parameter empty, the Stop Loss will move to the average entry price. The syntax can be a number followed by R or T.
Examples for a long position:
0.5R– Moves the Stop Loss to 50% of the initial risk range relative to the average entry price1.2R– Moves the Stop Loss above the average Entry price by 20% of the initial risk range3T– Moves the Stop Loss 3 ticks above the average entry price-2T– Moves the Stop Loss 2 ticks below the average entry price
Auto Trailing Stop Settings
You can configure up to 5 different auto trailing stop rules. Each rule has the following parameters:
Applicable To
Select which Reward’s associated Stop Loss will trail:
- All Stops: Moves all Stop Losses together
- Stop 1: Only moves the Stop Loss associated with Reward #1 order
Trailing type
Select from the following options:
Typical Bid Ask:
- For a Long position, the Ask price is monitored to trigger trailing
- For a Short position, the Bid price is monitored to trigger trailing
Opposite Bid Ask:
- For a Long position, the Bid price is monitored to trigger trailing
- For a Short position, the Ask price is monitored to trigger trailing
Last Price:
- For a Long position, the Last price is monitored to trigger trailing
- For a Short position, the Last price is monitored to trigger trailing
Trigger offset
This parameter defines the amount of profit required to trigger the initial Stop Loss adjustment (to begin trailing the Stop Loss). If you leave this parameter empty, the stop will trail from the moment price moves in profit. The syntax can be one of the following:
Format options:
- A number followed by R
- A number followed by %T followed by the referenced reward number
- A number followed by T
Examples:
0.5R– Once the profit reaches 50% of the initial risk (0.5R), the Stop Loss will begin trailing1.5R– Once the profit reaches 150% of the initial risk (1.5R), the Stop Loss will begin trailing50%T1– Once the profit reaches 50% of the targeted profit defined by Reward #1 (1st target), the Stop Loss will begin trailing100%T3– Once the profit reaches Reward #3 (3rd target), the Stop Loss will begin trailing10T– Once the profit reaches 10 ticks, the Stop Loss will begin trailing
Trail offset
This parameter adjusts how wide the trailing stop will be. If you leave this parameter empty, the original range between the Stop Loss and the average entry price will be used (1R). The syntax can be one of the following:
Format options:
- A number followed by R
- A number followed by T
- A number followed by TR
- A number followed by %P
Examples:
0.5R– The stop will trail with 50% of the original stop range1.2R– The stop will trail with 120% of the original stop range10T– The stop will trail with 10 ticks, meaning a pullback of 10 ticks will trigger the stop order1TR– The stop will trail with the original stop range plus 1 more tick-2TR– The stop will trail with the original stop range minus 2 ticks20%P– The stop will trail with 20% of profit, meaning the stop order will trigger when 80% of the unrealized profit is lost by a pullback to book 20% profit
Visible info section
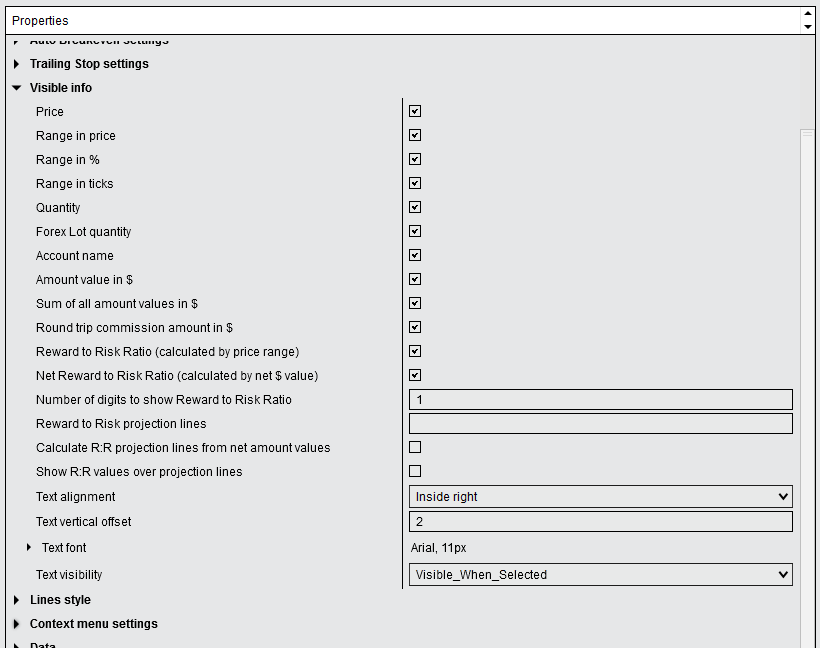
The settings for the Visible info section are as follow:
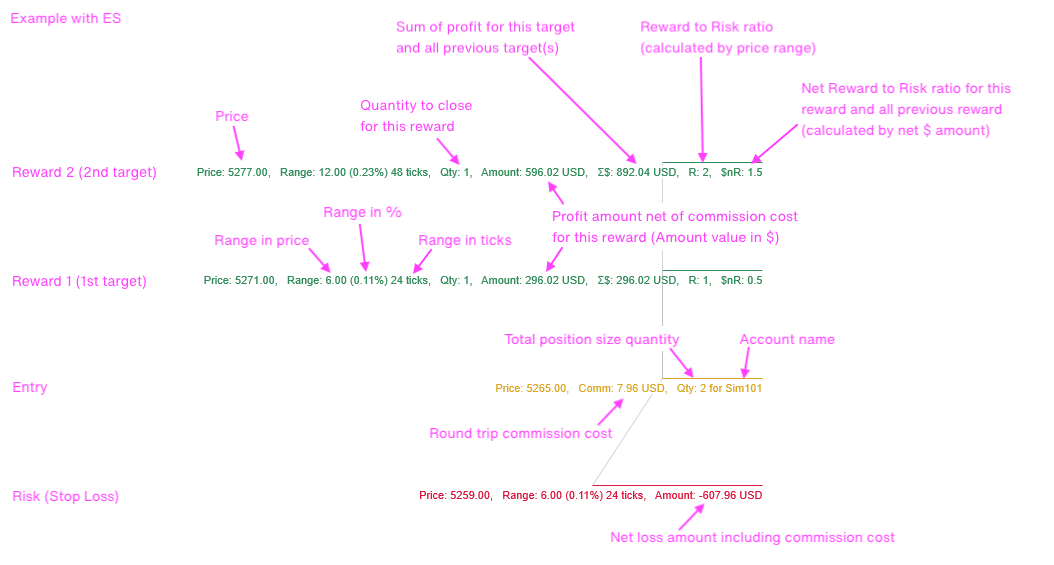
Number of digits to show Reward to Risk Ratio
You can select how many decimal places the Reward to Risk ratios are rounded to by entering the value in this parameter.
Examples:
- If the ratio is 1.567 and you enter 1, the ratio will be displayed as 1.6
- If you enter 2, the ratio will be displayed as 1.57
Reward to Risk projection lines
To see visual references of where specific Reward to Risk ratios are located, input the ratio values you want separated by semicolons.
Example:
To see the 1R, 1.5R, and 2R levels, enter: 1; 1.5; 2
Note: Use the decimal symbol as defined in the Microsoft Windows regional settings. For example, if your regional settings are set to Germany, use a comma instead of a period as the decimal symbol. You can add as many ratios as you want.
You can save your settings in a Default Template file to use this feature every time you use the tool. You can customize the Reward to Risk ratio lines style under the Lines style section.
Calculate R:R projection lines from net amount values
By default, the tool uses the price range from the Stop to the Entry to calculate the projection lines.
To have the projection lines calculated from the Risk amount value (including the commission cost), select this option.
Example: If the Risk amount is $112.50, a projection of 2 will draw a line at the price level equivalent to a profit of $225.
Show R:R Values Over Projection Lines
When you activate this option under the “Visible info” section, each Reward to Risk projection line will be labeled.
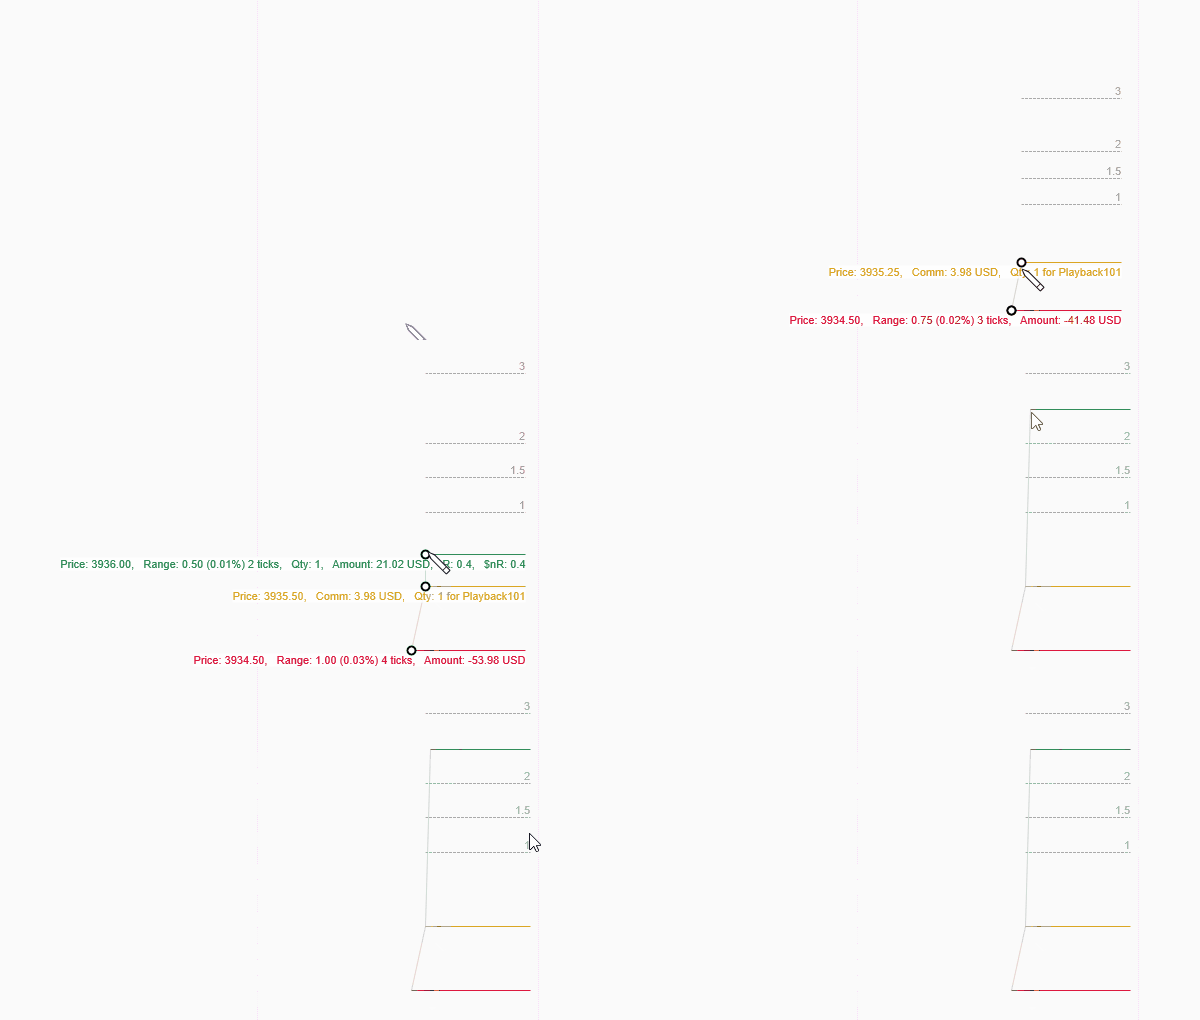
Text alignment
Controls how the text horizontally aligns within the Position Sizing drawing.
Text vertical offset
Controls the vertical spacing between the text displayed below each anchor line. Enter a positive value to increase the spacing and a negative value to decrease it.
Text font
Allows customizing font attributes (family, style, size) for all drawn text.
Text visibility
Select from the following options:
- Visible_When_Selected
- The text will be visible when you click on the drawing tool. Otherwise, it will be hidden.
- Always_Visible
- The text will always be visible.
- Do_Not_Show
- The text will always be hidden.
Line style
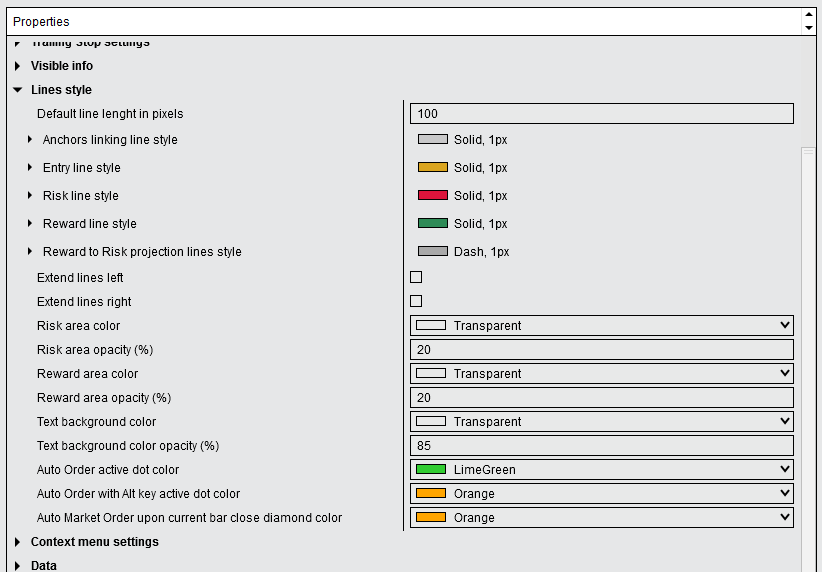
You can customize the appearance of the entry, stop, and reward(s) lines to your preferences. You can also select to extend the lines to the right edge of the chart and/or to the left edge of the chart.
Text background color
Defines the background color displayed behind the text. When set to Transparent, the chart’s background color is automatically used as the text background color. To achieve a truly transparent background instead, leave this parameter set to Transparent and set Text background color opacity to 0%.
Context Menu settings
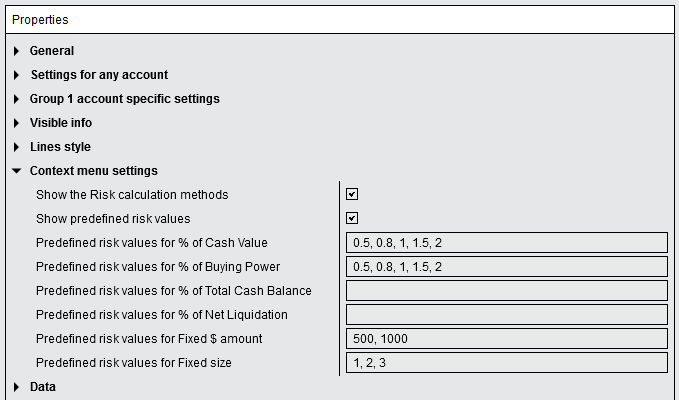
If you would like to quickly change the default risk value for a specific position, you can activate the option “Show predefined risk values” from the “Context menu settings” section. You also need to enter your desired predefined risk values for each risk calculation method in the respective parameter below. A maximum of 5 different risk values is supported.
Example:
To quickly change the % of risk of the account Cash Value from 0.5%, 0.8%, 1%, and 1.5%, enter each predefined risk value separated by the semicolon character: 0.5; 0.8; 1; 1.5 in the “Predefined risk values for % of Cash Value” box.
To apply these values by default on all new drawings, save your settings as the Default Template.
When you right-click on the Position Sizing drawing tool, you will have access to a context menu that allows you to quickly change the % of risk used to calculate the position size.

Submitting order
When you are ready to place the order related to the Position Sizing drawing tool you drew, right-click on the Position Sizing tool and click on “Submit the associated orders“.
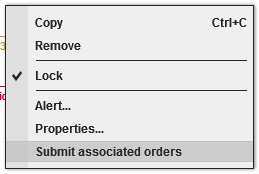
This will automatically create a pending order for your entry and automatically place OCO (One-Cancels-Other) orders for the stop loss and each profit target. OCO orders function similarly to creating an ATM strategy composed of a profit target and a stop loss, but using this tool eliminates all possible typing errors when creating the ATM strategy.
Order submission logic
For a long position:
- If the entry price is between the instrument’s current bid and ask, a buy market order will be submitted
- If the current instrument price is above the entry price, a pending buy limit order will be submitted
- If the current instrument price is below the entry price, a pending buy stop order will be submitted
For a short position:
- If the entry price is between the instrument’s current bid and ask, a sell market order will be submitted
- If the current instrument price is above the entry price, a pending sell stop order will be submitted
- If the current instrument price is below the entry price, a pending sell limit order will be submitted
News Event Restrictions and Orders
If a news event restriction is active and you submit the order, the order will not be submitted and you will receive a popup message.
If you have an active pending Entry order from a Position Sizing drawing tool that has news event restrictions, when the news event restriction becomes active, you will receive a popup message and the pending order will automatically be cancelled.
If you take no action, the order will automatically be re-submitted once the news event restriction is over. If you prefer not to have the order automatically re-submitted once the news restriction is over, right-click on the drawing tool and select “Cancel the pending re-submission order due for after News Event”. Once you are ready to re-submit the associated order to this drawing tool, right-click again on that tool and select “Submit associated orders”.
Help
User guide
Displays the URL link to this user guide. Copy and paste the link into your web browser to access the complete user guide and get the most out of this tool — including how to use it effectively and how to configure each available parameter.
Version
Displays the version number of the Position Sizing tool. This is a read-only parameter that shows which version of the tool is currently installed.
Important notes about pending Entry orders
Deleting the Position Sizing drawing tool while the Entry Order is pending
If you submit an entry order from a Position Sizing tool and delete the related Position Sizing drawing tool from the chart while the Entry order is still pending, the associated Stop(s) and Target(s) OCO orders should still be placed once the Entry order is filled.
Modifying the Position Sizing drawing parameters while the Entry order is pending
If you submit an entry order from a Position Sizing tool and change the related Position Sizing drawing tool parameters while the Entry order is still pending, the associated Stop(s) and Target(s) OCO orders will still be placed according to the original settings.
Example: You place a pending Entry order for 1 contract. While the Entry is pending, you modify the Position Sizing drawing to 2 contracts. The pending Entry order remains for 1 contract, and once filled, the Stop and Target OCO orders will be placed for 1 contract but with the updated Stop and Target price values.
Disclaimer
Please use a Sim account or the Market Replay connection to become familiar with how orders are submitted from the Position Sizing drawing tool. We will not be responsible for any loss you may incur by using our Products.